Introduction
In this lab we will use a region on chr2, around the LCT gene, that has been shown to control how lactose is tolerated in adults. The 3 samples we will work with have been sequenced at low coverage in the 1000 Genomes Project. Much like the corresponding lecture, we will go through alignment, deduplication, base quality score recalibration, variant calling and variant filtering. In addition, we will annotate the variants and view the alignments.
Running commands
Throughout the exercises, we will illustrate commands in the format:
command <parameter1> <parameter2> ...
This signifies that you should replace <parameter> with the correct parameter type, for example your input file name, output file name, directory name, etc. If you don’t know which parameter you should supply, please ask.
General advice
- Use tab completion when possible.
- Running a command without parameters will, often, return a default help message on how to run the command.
- Copying and pasting commands from the exercise to terminal can result in formatting errors. Especially backslash (“\”), which is used to show that the command continues on the next line, can be a bit tricky.
- A line starting with ‘#’ is a comment
- Once a command has resulted in successful completion, save it! You will redo the procedure again with another sample and this will save time.
- If you change the node you are working on you will need to reload the tool modules. (See ‘Accessing programs’ below)
- Check that the output file exists and is a reasonable size (use ls -l) after a command is completed as a quick way to see that nothing is wrong. A common mistake people make is to attempt to load input files that do not exist or create output files where they cannot write.
- Giving good names to your outfiles that describes what has been done will help you.
- Again: replace <parameter> with the correct parameter in the commands
- Google errors, someone in the world has run into EXACTLY the same problem you had and asked about it on a forum somewhere.
Book your node
First, let us book a node and set up the programs that we will be using. Make sure you only do this once!
salloc -A g2019015 -t 04:00:00 -p core -n 5 --no-shell --reservation=g2019015_3 \
-M snowy &
# Remember to change to g2019015_4 on the 4th day of the course
# We have reserved nodes during the course only
Once your job allocation has been granted (should not take long) you can connect to the node using ssh.
To find out the name of your node, use:
squeue -u <username> -M snowy
# Node name is found under nodelist header. You should only see one node here.
and to connect to the node:
ssh -Y <nodename>
Accessing programs
We’re going to need several programs that are installed in the module system. To access the bioinformatics modules you first need to load the bioinfo-tools module:
module load bioinfo-tools
This makes it possible to load the individual programs we need:
module load bwa/0.7.17
module load samtools/1.8
module load GATK/3.7
module load picard/2.10.3
# It is not necessary to add version number, but it is recommended if you want to rerun the same commands later.
# Picard and GATK are java programs, which means that we need the path to the program file, therefore UPPMAX sets a variable when you load these modules ($GATK_HOME or $PICARD_HOME).
Creating a workspace
During this lab you should work in “your” folder under the course’s nobackup folder, just like you have done during the previous labs. Start by creating a workspace for this exercise in your folder, and then move into it.
mkdir /proj/g2019015/nobackup/<username>/ngsworkflow
cd /proj/g2019015/nobackup/<username>/ngsworkflow
Data for this lab
All input data for this exercise is located in the folder:
/sw/share/compstore/courses/ngsintro/reseq/data/
# These files are read-only so that the files are not accidentally deleted
The reference genome
Before we can align our sample we need a reference genome. For our exercises, we’ll use only human chromosome 2, however in a real situation you should use the full genome. Create a symbolic link to the reference in the project directory to your workspace:
ln -s /sw/share/compstore/courses/ngsintro/reseq/data/ref/human_g1k_v37_chr2.fasta
Do the same with the fastq files
ln -s /sw/share/compstore/courses/ngsintro/reseq/data/fastq/HG00097_1.fq
ln -s /sw/share/compstore/courses/ngsintro/reseq/data/fastq/HG00097_2.fq
BWA index
Some associated files are expected by the aligner. You will only need to create these files once.
bwa index -a bwtsw human_g1k_v37_chr2.fasta
# BWA is a program that takes different commands as the first argument, here index, used with the bwtsw algorithm
Check to see that several new files have been created:
ls -l
Samtools and Picard indeces
We will also build two other sequence dictionaries for the reference, which just lists the names and lengths of all the chromosomes. Other programs will need these later.
samtools faidx human_g1k_v37_chr2.fasta
java -Xmx16g -jar $PICARD_HOME/picard.jar CreateSequenceDictionary \
R=human_g1k_v37_chr2.fasta O=human_g1k_v37_chr2.dict

# Backslash ("\") is used to show that a command continues on the next line.
# This can be a bit tricky if you copy the command!
Aligning the reads
We are skipping the quality control and trimming of reads for this exercise, but two excellent tools are FastQC & MultiQC. You will get a chance to try these tools later.
We are going to start by aligning the reads for the HG00097 sample, using bwa mem. We give the paths to our reference genome and the forward (_1.fq) and reverse (_2.fq) read fastq files.
bwa mem -t 5 human_g1k_v37_chr2.fasta HG00097_1.fq HG00097_2.fq > HG00097.sam

# -t 5 is the number of threads to use (the number of cores you booked)
# You have to use a file redirect ">" for the output, otherwise it will be written to stdout (your screen).
You may take a look (use less) at one fastq file to understand the format and contents of these files.
Creating a BAM file and adding Read Group information
We want to convert our SAM to the more space efficient BAM before proceeding downstream.
We also need to add something called read groups to our BAM file, because this is needed in the variant calling. Read groups are tags in the BAM file that allow us to trace various technical features, such as which flowcell that was used to generate the reads. For a detailed description of read groups, please read this article at GATK-forum. We don’t know the read groups for our samples, but we assume that each fastq file was generated from one library preparation derived from one biological sample that was run on one lane of a flowcell in the Illumina machine. We will add “toy” read groups corresponding to this.
We will use Picard to add read group information, and simultaneously sort the file, and then output it as BAM.
java -Xmx16g -jar $PICARD_HOME/picard.jar AddOrReplaceReadGroups INPUT=<sam file> OUTPUT=<bam file> \
  SORT_ORDER=coordinate RGID=HG00097-id RGLB=HG00097-lib RGPL=ILLUMINA RGPU=HG00097-01 RGSM=HG00097

  # Typically the BAM file has the same name as the SAM but with the .sam extension replaced with .bam
  # Replace HG00097 with different sample name if running other samples
We also need to index this BAM, so that programs can randomly access the sorted data without reading the whole file. This creates an index file similarly named to the input BAM file, except with a .bai extension.
java -Xmx16g -jar $PICARD_HOME/picard.jar BuildBamIndex INPUT=<bam file>
- Compare the size of the sam and bam files using ls -l
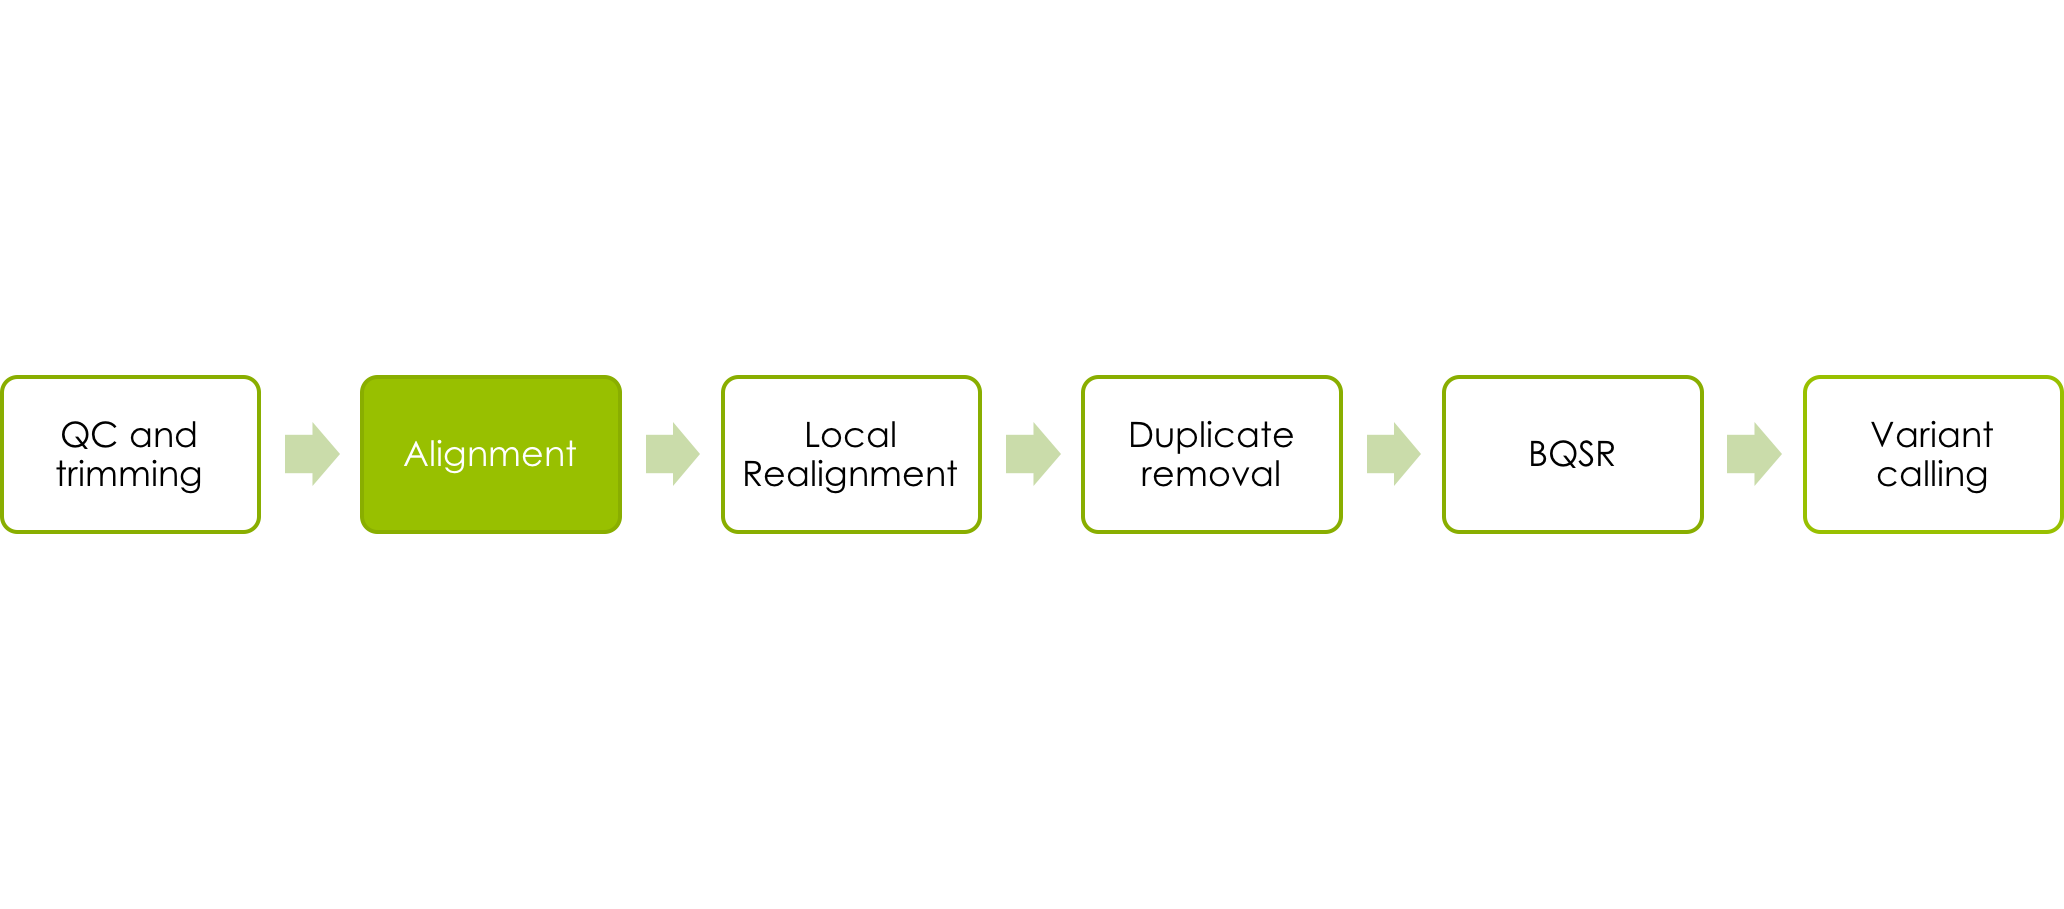
From alignments to variant calls
The reads have now been aligend to the reference, but these files can still be improved a bit before we use them for variant calling. Genome Analysis Tool Kit (GATK) is a popular set of tools used for this and for variant calling. GATK comes with a “best practise”, which gives a suggestion on how to get from raw bam to filtered variants.
In brief, their best practise consists of:
- Local realignment, not necessary if you do variant calling with HaplotypeCaller or Mutect
- Marking duplicates
- Base quality score recalibration
- Sample wise variant calling
- Joint genotyping of all samples
- Variant filtration
However, this may need adjustment depending for example on your experimental setup. It is therefore important to check the best practise in each case.

Marking duplicates
Next, we’re going to use Picard to mark duplicate reads:
java -Xmx16g -jar $PICARD_HOME/picard.jar MarkDuplicates INPUT=<input_bam> OUTPUT=<marked_bam> \
METRICS_FILE=<metrics_file> READ_NAME_REGEX=null
# marked_bam: you need to specify an output name, which will be used in the following steps.
# It is suggested to use file names that describe what has been done, e.g. <sample>.dedup.bam
# The metrics file is a text file that will be created and contains some stats about duplicates.
- How many duplicates were detected? Check the metrics file.
Again, we need to index the new bam file before proceeding.
java -Xmx16g -jar $PICARD_HOME/picard.jar BuildBamIndex INPUT=<marked_bam>
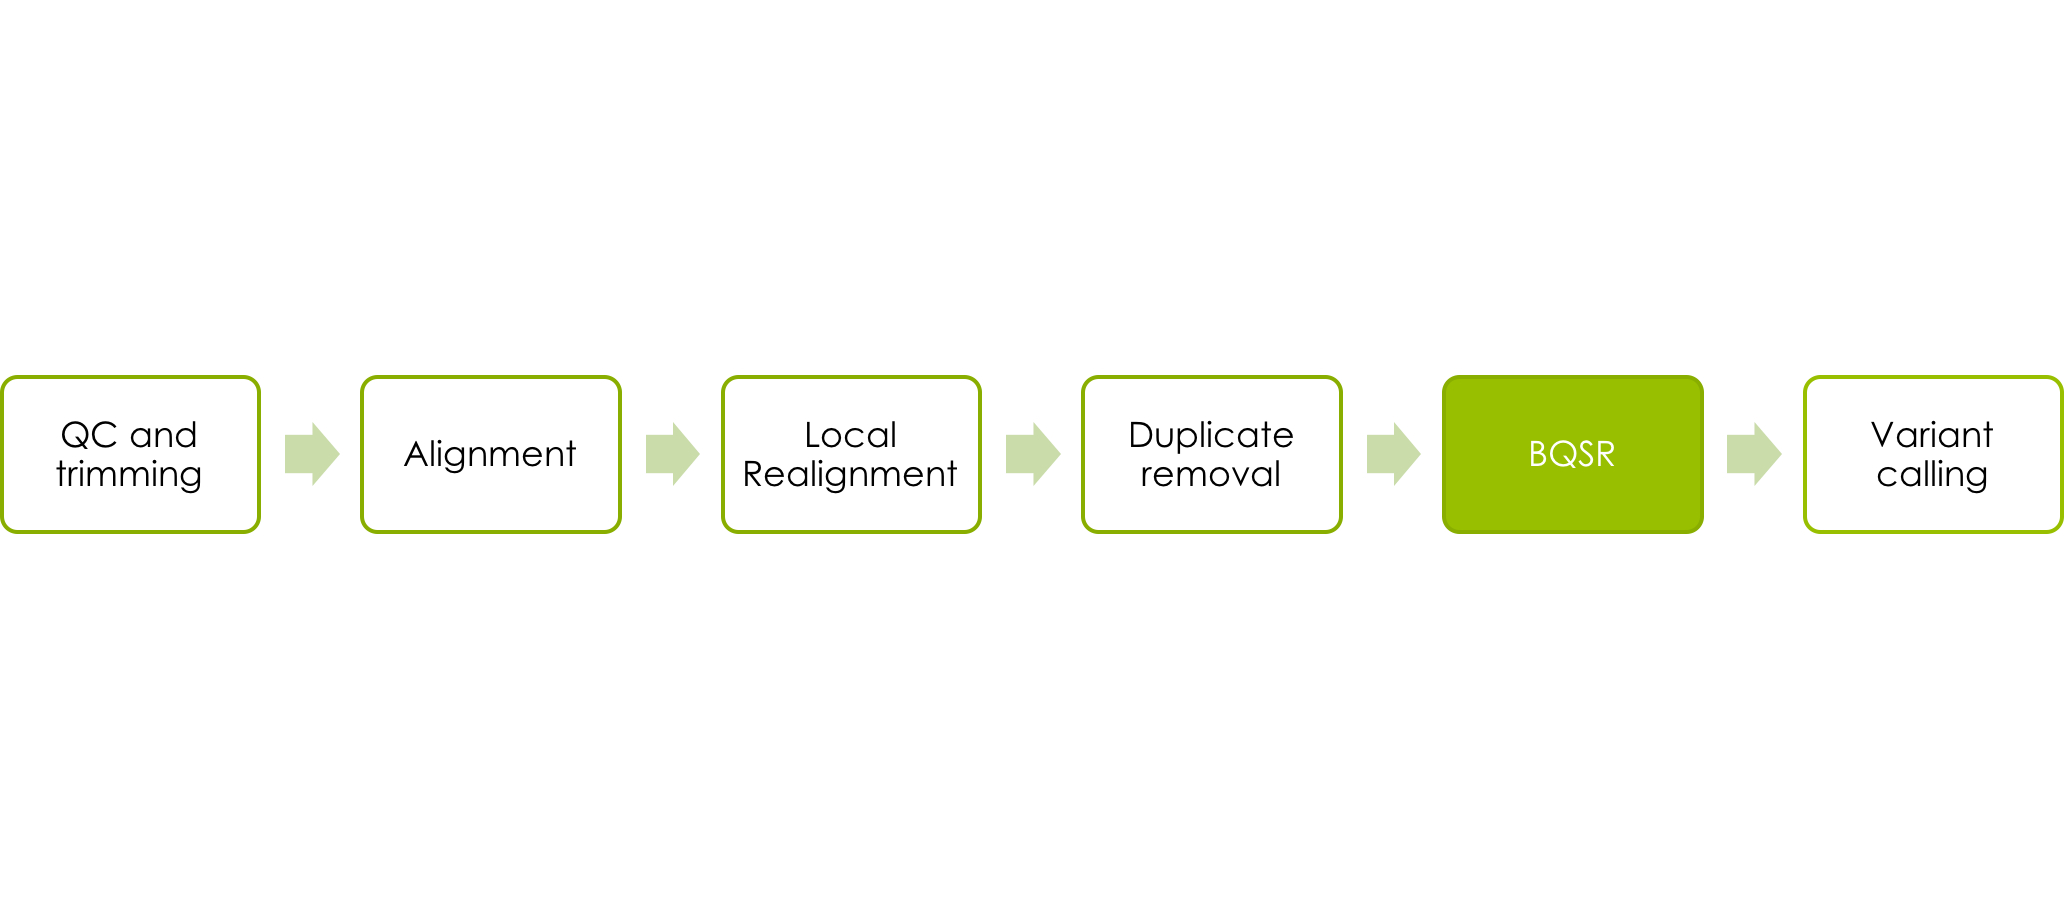
Base quality score recalibration (BQSR)
Next we want to perform quality recalibration with GATK. We do this last, because we want all the data to be as clean as possible at this point. This is performed in two steps: BaseRecalibrator and PrintReads. As usual we give our latest BAM file as input_bam. First, we compute all the covariation of quality with various other factors using BaseRecalibrator:
java -Xmx16g -jar $GATK_HOME/GenomeAnalysisTK.jar -T BaseRecalibrator \
  -R human_g1k_v37_chr2.fasta -I <input_bam> -o <calibration_table> \
  -knownSites /sw/share/compstore/courses/ngsintro/reseq/data/ref/1000G_phase1.snps.high_confidence.b37.chr2.vcf

  # knownSites is a list of known high quality variants
  # calibration_table is a new file with the covariation data written to it and used in the second step
We need to supply a list of known sites to BaseRecalibrator. If you are sequencing an organism with few known sites, you could try variant calling once before base quality score recalibration and then use the most confident variants as known sites.
In the next step PrintReads applies the recalibration and outputs the recalibrated bam file. GATK automatically indexes the new BAM for us.
java -Xmx16g -jar $GATK_HOME/GenomeAnalysisTK.jar -T PrintReads \
-R human_g1k_v37_chr2.fasta -BQSR <calibration_table> -I <input_bam> -o <output_bam>

# The input_bam is the same as in the BaseRecalibrator step as we have not changed the bam in that step.
# calibration_table is the file created in the previous step.
A good method article describing BQSR.

Variant Calling
Now we’ll run the GATK HaplotypeCaller on our BAM file and output a gVCF file.
java -Xmx16g -jar $GATK_HOME/GenomeAnalysisTK.jar -T HaplotypeCaller \
  -R human_g1k_v37_chr2.fasta --emitRefConfidence GVCF -I <input_bam> -o <output>.g.vcf

# The output gVCF file needs to have the ending .g.vcf
# You will have one g.vcf file per sample, so make sure the sample id is in the file name
Rerun the workflow for additional samples
If you want to repeat the procedure you can now use your saved commands and rerun the mapping and variant calling steps for at least one more sample (HG00100 or HG00101) from the course directory before continuing with the next step. Alternatively, you can copy the .g.vcf files of the two additional samples.
cp /sw/share/compstore/courses/ngsintro/reseq/data/vcf/<sample>.g.vcf .
Joint genotyping
Now you will call genotypes from all the gVCF-files produced in the previous step with GenotypeGVCFs. This will create one file with unfiltered variants for all samples (HG00097, HG00100 and HG00101).
java -Xmx16g -jar $GATK_HOME/GenomeAnalysisTK.jar -T GenotypeGVCFs \
  -R human_g1k_v37_chr2.fasta --variant <sample1>.g.vcf --variant <sample2>.g.vcf --variant <sample3>.g.vcf \
  -o <raw_variants>.vcf
Filtering Variants
The next thing we will do is filter the variants. For a large dataset with many variants it is recommened to use GATKS VQSR technique for training filter thresholds on known variants. Since we are working with a small data set we’re going to use hard filters and parameters suggested by GATK.
The parameters are slightly different for SNPs and INDELs, which we have called together and are both in our VCF. You therefore need to perform the filtering in two separate steps: first select all SNPs and filter them, then select all indels and filter them.
SNPs can be selected and filtered like this:
java -Xmx16g -jar $GATK_HOME/GenomeAnalysisTK.jar -T SelectVariants \
-R human_g1k_v37_chr2.fasta -V <raw_variants>.vcf -selectType SNP -o <raw_snps>.vcf

java -Xmx16g -jar $GATK_HOME/GenomeAnalysisTK.jar -T VariantFiltration \
-R human_g1k_v37_chr2.fasta -V <raw_snps>.vcf -o <filtered_snps>.vcf \
--filterExpression "QD < 2.0" --filterName QDfilter \
--filterExpression "MQ < 40.0" --filterName MQfilter \
--filterExpression "FS > 60.0" --filterName FSfilter \

# Each filterName option has to immediately follow the filterExpression it matches.
# Do not worry about the warnings here, but if you have time, try to find out why you get these warnings!
Indels have slightly different filters:
java -Xmx16g -jar $GATK_HOME/GenomeAnalysisTK.jar -T SelectVariants \
-R human_g1k_v37_chr2.fasta -V <raw_variants>.vcf -selectType INDEL -o <raw_indels>.vcf

java -Xmx16g -jar $GATK_HOME/GenomeAnalysisTK.jar -T VariantFiltration \
-R human_g1k_v37_chr2.fasta -V <raw_indels>.vcf -o <filtered_indels>.vcf \
--filterExpression "QD < 2.0" --filterName QDfilter \
--filterExpression "FS > 200.0" --filterName FSfilter \
Merge SNPs and Indels
Once you have the filtered calls for both SNPs and INDELs, you can combine these using CombineVariants:
java -Xmx16g -jar $GATK_HOME/GenomeAnalysisTK.jar -T CombineVariants -R human_g1k_v37_chr2.fasta \
--variant:snp <filtered_snps>.vcf --variant:indel <filtered_indels>.vcf -o <my_variants_filtered>.vcf \
-genotypeMergeOptions PRIORITIZE -priority snp,indel
Open your filtered VCF with less and page through it. It still has all the variant lines, but the FILTER column that was blank before is now filled in, with PASS or a list of the filters it failed. Note also that the filters that were run are described in the header section.
Analyse your results
There are several tools you can use to analyse your results, once you have your multi-sample vcf file. You can get various statistics, add annotations, view the alignments etc.
vcftools
Vcftools can be used to work with vcf files, either for manipulation or getting statistics. We can use vcftools to remove all variants that did not pass our filters:
module load vcftools/0.1.15

vcftools --vcf <my_variants_filtered>.vcf --out <output_prefix> --remove-filtered-all --recode \
--recode-INFO-all
# --recode is used to create a new vcf file as output, otherwise only statistics are calculated.
- How many variants passed the filters? (Check the log file)
- Try to find out how many variants that are indels (Hint: ‘man vcftools’ will list available options.)
Variant annotation
There are several tools for variant annotation. Some of the most frequently used are VEP (Variant Effect Predictor), SnpEff and Annovar. We will try Annovar. Note that these tools are predictors and may give slightly different results. The output is also dependent on your choice of gene set.
Annovar
module load annovar/2017.07.16
Annotation datasets
Annovar uses downloaded annotation tracks to annotate the input file. These can be downloaded using Annovar, however many annotation tracks are already downloaded in the uppmax installation of annovar, and will be used in this lab.
#$ANNOVAR_HOME is set when annovar module is loaded. To see which datasets are already downloaded
# you can use
ls $ANNOVAR_HOME/humandb/
All datasets available through Annovar can be found here.
Input format
Annovar can use a vcf file as input and also output the results as a vcf file. However, to make the results easier to read we will first create an annovar formatted file and produce tab delimited results.
convert2annovar.pl -format vcf4 -allsample -withfreq <vcffile> > <annovarfile>
Annotate
Now you are ready to annotate your variants. Here, we will use RefSeq genes, dbSNP-ids and allele frequencies from 1000 genomes.
# Use table_annovar.pl -h to find all options

table_annovar.pl <annovarfile> $ANNOVAR_HOME/humandb -buildver hg19 -outfile <myanno> -remove \
-protocol refGene,snp138,1000g2015aug_all,1000g2015aug_eur,1000g2015aug_afr -operation g,f,f,f,f

# buildver: Should be the same build as the reference used for alignment.
# protocol: Datasets used for annotation
# operation: Are they gene (g), filter (f) or region (r) based annotations?
Your results can be found in <myanno>.hg19_multianno.txt. You can now try to answer questions like:
- What is the position of the variant that leads to retained lactase activity in adults? It is refered to as rs4988235 in dbSNP.
- Is the variant located within a gene, if so, which gene? (What effect could this have on the LCT gene?)
- What are the allele frequencies of the variant in different populations?
- What is the allele frequency in the Swedish population? See the SweGen Variant Frequency Browser
- Are there any coding (exonic) variants in the LCT gene?
- Add one or more datasets and rerun the annotation!
Use IGV to look at your data
Next, we want to look at the data. For that, we will use IGV (Integrative Genomics Viewer). You can launch it from UPPMAX using your graphical forwarding, -X or -Y, as you may have already tried, see here. However, here we will show how to run it on your local machine.
Launching IGV locally
Go to the IGV download page, and follow the instructions. If you have not downloaded IGV before, it will prompt you to fill in some information and agree to license. Launch the viewer through webstart. The 1.2 Gb version should be sufficient for our data.
Download data from Uppmax
We need to download some data to our local machines so IGV can find it. Open a new terminal, but do not log in to UPPMAX. You may want to create a new folder for the exercise (cd to the new folder). Now we’re going to use the command scp (secure copy) to copy bam (and .bai) and vcf files. <username> is your UPPMAX username. It will prompt you for your UPPMAX password, then it should download your files. You will need the bam files of all 3 samples: HG00097, HG00100 and HG00101.
# You can copy your recalibrated bam files (from the BQSR exercise above) like this:
scp <username>@rackham.uppmax.uu.se:/proj/g2019015/nobackup/<username>/ngsworkflow/<recalibrated_bam>.ba* ./
# And the filtered multi-sample vcf:
scp <username>@rackham.uppmax.uu.se:/proj/g2019015/nobackup/<username>/ngsworkflow/<my_filtered_variants>.vcf ./
If you are missing some of the bam files or the vcf you can do this instead:
# Copy the files from the course directory:
scp <username>@rackham.uppmax.uu.se:/sw/share/compstore/courses/ngsintro/reseq/data/bam/<sample>.dedup.recal.ba* ./
scp <username>@rackham.uppmax.uu.se:/sw/share/compstore/courses/ngsintro/reseq/data/vcf/my_variants_filtered.vcf ./
Ready to view data
Choose reference in IGV
First we want to make sure we have the right reference, i.e. the same reference used for mapping the reads.
- In IGV, go to the popup menu in the upper left and set it to “Human hg19”.
Get coverage
- Go under the Tools menu and select “Run igvtools…”. Choose the command “Count” and then use the Browse button next to the Input File line to select the BAMs (not the bai) that you just downloaded. It will autofill the output file.
- Now hit the Run button. This generates a .tdf file for each BAM. This allows us to see the coverage value for our BAM file even at zoomed out views.
Load bam files and vcf
Close the igvtools window and go back to the File menu, select “Load from File…” and select your BAMs (not the .bai or the .tdf), which should appear in the tracks window. Next, load the vcf file. You will have to zoom in before you can see any reads. You can either select a region by click and drag, or by typing a region (chr:from-to) or gene name in the text box at the top. Now you can answer questions like:
- What is the read length?
- Can you find the variant shown to be associated with lactose tolerance?
- Do you have coverage in this region in all samples?
- Which samples do you think should avoid drinking milk? Any heterozygotes?
- Does this agree with the genotype in the vcf file?
Customizing the view
Change the track features
If you control-click (or right click) on the track name at the left, you will get a popup menu with several options. For example, click the gene track and play with the view.
If you go to a read alignment track, you can control some useful features of the display. One is how you color the reads and another is the grouping. Are there any colored reads? Why?
Change the preferences
Go under the View menu and select Preferences. Click on the Alignments tab. There are a number of things we can configure. Feel free to play with them.
Extra labs
Please continue here if you have time left!
UCSC Genome Browser
The UCSC Genome Browser is a collection of tools for viewing and manipulating genomic data from public databases. In this extra lab we will upload our filtered variants to the UCSC genome browser, and look at evolutionary conservation of the genomic region surrounding the lactase persistent allele. We also encourage you to explore other types of data available in the UCSC Genome Browser. Plenty of documentation is available about UCSC Genome Browser, so please look at these sites to learn more:
http://www.genome.ucsc.edu/training/index.html
http://www.genome.ucsc.edu/training/ucscGeneFishing.pdf
-
Go to https://genome.ucsc.edu.
-
Click on “Genomes” in the upper menu and select “Human GRCh37/hg19”. This will take you to the version of the human reference assembly that we have been working with.
-
Click on “My Data” in the upper menu, select “Custom Tracks”, and click on “add custom tracks” on the next page.
-
Click on the “Choose File” button to upload data, browse to the vcf file with filtered variants on your local computer, and press “Submit”. Then click “go” to view the uploaded variants in the Genome Browser.
-
Zoom in to the relevant part of the genome. We only have data for a small region on chromosome 2 surrounding the LCT gene. An easy way to find the relevant region is to type “LCT” in the search window on the top of the page, press “go”, and then select “LCT (uc002tuu.1) at chr2:136545415-136594750 - Homo sapiens lactase (LCT), mRNA.” under “UCSC Genes”.Then use the zoom out buttons to view both the LCT gene and the MCM6 gene.
-
Zoom in to the variant that leads to retained lactase activity in adults (rs4988235). Look at the “Multiz Alignment of 100 Vertebrates” track that shows evolutionary conservation of this genomic region across 100 vertebrates. (It is possible to directly enter the rs-number in the search window.)
Please answer the following questions:
Which species appear to have the DNA sequence surrounding the rs4988235 variant in their genomes?
What allele does these species have at the variant position? -
Play around with the various annotations tracks that are available in the UCSC genome browser and explore what is known about this particular region of the human genome. All tracks can be displayed in different modes, from “full” to “hide” and this regulates at what detail the track will be displayed.
BEDTools
BEDTools is a collection of tools used for many different tasks in genomics. It supports different input formats, including .bam, .bed, .gff or vcf. The bed format is central; each line describes a feature, where the three first columns are required (chromosome, start coord, end coord) and the rest describe the feature (e.g. a gene). We will try the intersect tool:
module load BEDTools/2.27.1

#Copy this bed file from the course directory and look at it using e.g. less
cp /sw/share/compstore/courses/ngsintro/reseq/data/genes.bed .

bedtools intersect -wo -a <vcffile> -b <bedfile> > <subset.vcf>
- How many variants are found within the given gene regions? (Hint: use wc -l to count the lines in your output file.)
- How would you find all variants that are NOT in genes? (Look at the available options using bedtools intersect -h)
Samtools view and the bit flag
Viewing duplicates and understanding the bit flag
We can look at the duplicates that we marked with Picard above, using a filter on the bit flag. The mark for duplicates is the bit for 1024, we can use samtools view to look at them. First go to this online utility that is helpful for decoding sam flags. Notice that it can also be used in reverse to find the appropriate flag. Now look at your data.
# We can count the marked reads, with samtools and the -c option.
samtools view -f 1024 -c <marked_bam>

 Or if we want to look at these reads:
samtools view -f 1024 <marked_bam> | less
- Do you get the same number of duplicates as in the metrics file?
- Why do we use samtools to look at the BAM file? Could we have looked at it with just less?
VEP
VEP is another popular tool for variant annotation.
module load vep/92
#To see which cache is default use
#echo $VEP_CACHE
vep --cache --dir_cache $VEP_CACHE --assembly GRCh37 --offline --force_overwrite --symbol --af_1kg -i <vcffile> -o <outfile>
# To list all options see: http://www.ensembl.org/info/docs/tools/vep/script/vep_options.html
Do you get the same annotations as with annovar?
Additional information
About the lactase persistence allele
Read e.g. the first three pages of Matter el.al., 2012 to find out more details about the lactase persistence allele. The variant (rs4988235) is here referred to as LCT-13910C>T.
More info on Quality Scores
Here is a technical documentation of Illumina Quality Scores: technote_Q-Scores.pdf